


As a DIY enthusiast working with wood, you need to know how moisture in the wood and the environment can affect the structural integrity of your produced pieces. How dry should wood be before you use it in a project?
Wood should be dry enough to attain moisture content (MC) that matches the equilibrium moisture content (EMC) of the location where the finished piece will be used. The wood also has to be stored at this EMC range before the start of a project. The moisture content of 6-8% is optimal for woodworking.
How do you find out the EMC of a location? How can you dry wood quickly for a project? This article will cover all of these and more.
How Dry Should Wood Be Before Woodworking?
Three main factors come into play when you’re considering how dry wood should be before woodworking: Relative Humidity (RH), Equilibrium Moisture Content (EMC), and Moisture Content (MC).
We won’t go into the technical details, but you should know that RH refers to the level of humidity in the vicinity, while moisture content is the amount of water in a substance. On the other hand, EMC refers to a state where a hygroscopic material (wood in this case) can’t lose or gain moisture.
Wood’s hygroscopic nature is such that it constantly tries to gain or lose moisture as the air around it changes. However, the process of losing or gaining moisture also causes wood to expand or shrink.
With RH increasing, the wood’s MC will increase, leading to expansion. As the humidity decreases, the MC will also decrease, leading to shrinkage. At some point, the wood will stop gaining or losing moisture. This is the equilibrium moisture content (EMC).
Now, according to experts, you should ensure the wood is dry enough to get the MC content down to within 2% of the EMC for the area where you intend to use the crafted piece. However, most people typically match the location’s EMC.
Of course, you need to work out the EMC of the space to nail down the MC to target. To get the EMC, you need to know the RH of the area.
To get the RH percentage, use the formula for calculating it (Source: Sciencing). Once you’ve worked out the relative humidity of the space you intend to use the woodwork once completed, it’s time to find the EMC. There are a few ways to find EMC, but a method that can get you a rough estimate is to divide the RH by 5 (Source: NCSU).
With the EMC achieved, you can aim to match the value with the MC of the wood you intend to use for the project. Below is a table you can use as a guide.
| Relative Humidity Estimates | Location EMC | Acceptable Wood MC |
| 15-30% | 5% | 3-5% |
| 30-45% | 8% | 6-8% |
| 45-60% | 11% | 9-11% |
| 60-75% | 14% | 12-14% |
| 75-90% | 17% | 15-17% |
Generally, you can aim for MC values of around 6-8% for wood to be used on indoor woodworking projects. For outdoor projects, you can dry the wood to bring the MC down to around 9-14% (Source: Wagner Meters).
Wood has to be dry enough to prevent problems such as damage from fungi formation, shrinkage, and difficulties with adhesive uptake. When you settle on an optimal MC to work with, you have to ensure the storage environment mirrors the EMC values for the intended destination of your wooden pieces.
How Can You Tell if Wood Is Dry Enough for Woodworking?
Once you’ve worked out the MC range for wood to be used in woodworking, you can check wood pieces to see if they fit in the range or not, i.e., knowing if they are dry enough. There are a couple of ways to do this:
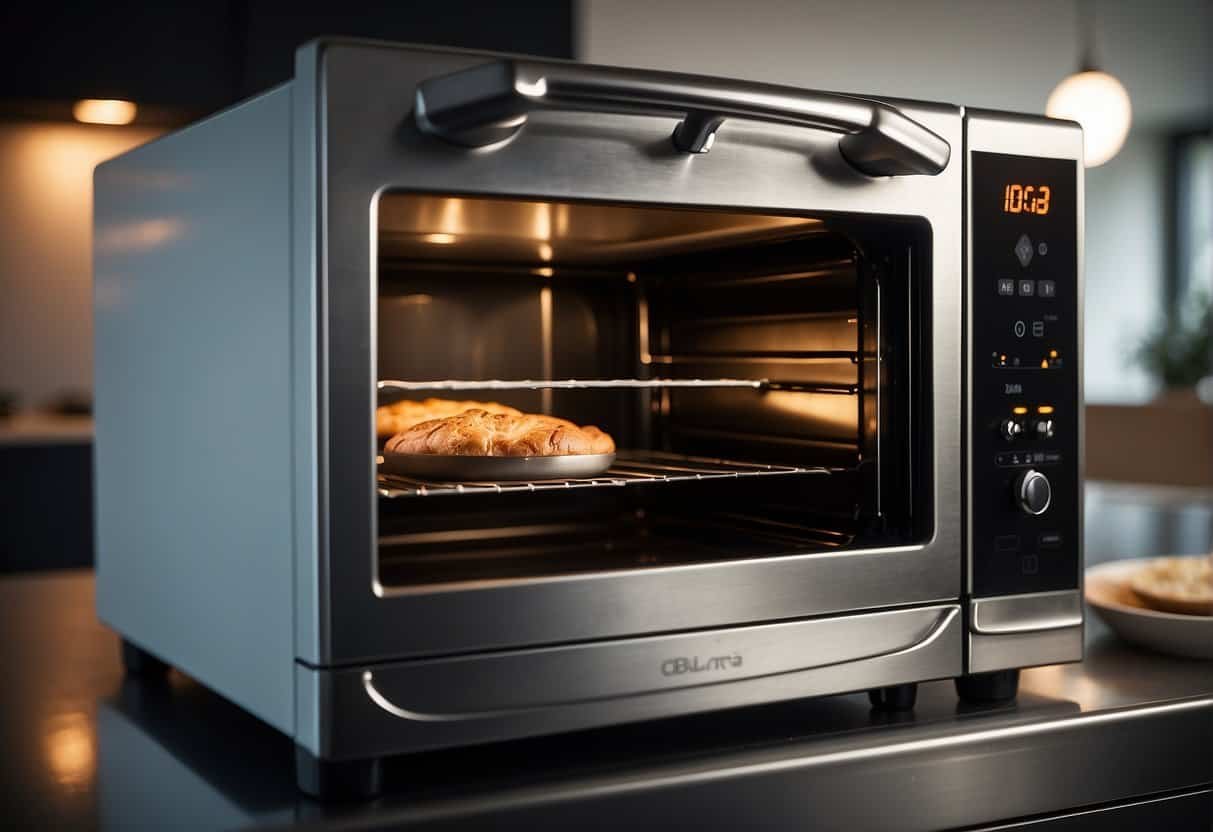
Oven Dry Testing
Oven dry testing is one of the best ways to know if the wood is dry enough to use (Source: ASTM). In oven-dry testing, you have to weigh the wood first and then put it through a kiln or a properly ventilated oven for a length of time.
Weigh the wood after a while to see if there’s any change in the weight. If the weight doesn’t change, the wood is dry enough. Generally, expert woodworkers regard this method as one of the best ways to measure the moisture content in wood—as long as the process is conducted in the right way.
However, there are a few downsides to this approach—especially in the context of DIY woodworking:
- It’s hard to justify the cost of a kiln. While professional woodworkers can shell out some money for an oven or a kiln specifically designed for drying wood, most DIY enthusiasts can’t justify the costs. Using a makeshift oven for the process will only give inaccurate results.
- You need to cut out wood pieces to use. Heat exposure can change the appearance of the wood, so you’ll need to budget a little extra to replace the sample wood when you’re done testing.
- You’ll need to devote hours to the process. Rushing through the oven testing method will give you poor results and lots of wasted wood.
These disadvantages rule out oven testing as a way of checking if the wood is dry enough for DIY enthusiasts. Fortunately, there’s an alternative:
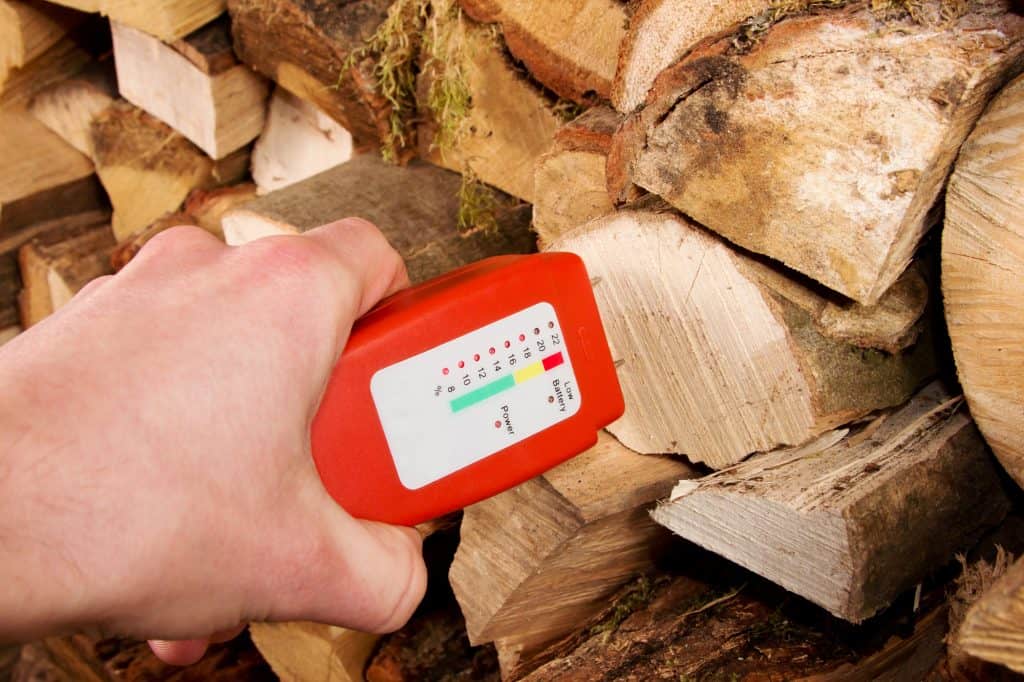
Using a Moisture Meter
There’s a tech solution to almost everything these days, so it’s no surprise that we have a moisture meter that can help check if the wood is dry enough. There are many wood-moisture meters available today, most of them small enough to fit in your pocket.
They are grouped into pinless and pin moisture meters.
Pin Moisture Meters
Pin moisture meters have multiple electrode protrusions, which help measure the sample moisture content in a piece of wood using electrical resistance (Source: Grainger). Water is a conductor, and wood is an insulator.
So, if there is a lot of resistance when an electric current passes via the electrodes into the wood, then the wood is dry enough, and you’ll get a %MC reading.
Some examples of these meters are Mecurate Digital, Reddragon MT-18, and the General Tools MMD4E, all from Amazon.com. The meters are fairly accurate, but some people look at the tiny holes they leave behind as a downside. However, you can avoid this by checking the moisture content in any wood piece by measuring hidden corners.
Pinless Moisture Meters
Pinless moisture meters don’t need to dig into the wood to get a reading as they are equipped with scanning plates that can pass electromagnetic waves through a piece of wood to get a reading of the average moisture content in the area scanned.
General Tools MMD7NP, Dr.meter Inductive Pinless, and Klein Tools ET140 are some examples from Amazon.com. These meters are fairly accurate, but they won’t get accurate readings if they are not making unimpeded contact with the wood surface.

Can Wood Be Too Dry for Woodworking?
Wood can be too dry for a woodworking project. If the moisture content is too low for the project (based on the EMC values discussed earlier), it’s too dry for the job.
While you can still use such wood for a project, it can lead to a few problems, including the following:
Splitting
Wood that’s too dry splits more easily. This will happen whether you’re working with softwood or hardwood. Extremely thin moisture content means the piece of wood is less resistant to breakage. Using wood prone to splitting to complete a project ruins the structural integrity of the construction.
There’s a chance you won’t complete the job without the split happening, but even when it doesn’t, the finished product will likely disintegrate fairly quickly as weather fluctuations begin to affect the piece.
Faster Tool Wear
Standard woodworking tools like drill bits, saw blades, chisels, and even hammers, undergo a lot more strain when you’re working with extremely dry wood. The sharp bits become dull quickly while blades and joints undergo a lot more strain, translating to breakages.
Reduced Malleability
When wood is too dry, it will be harder to carve, nail, or screw. This can make your job doubly difficult. Forcing the issue will most likely cause knots and cracks. There’s also a higher probability of errors as you try to exert a lot more force to get a job done.
To avoid these issues, it’s best to stick to the optimal moisture content for the project.
How To Dry Wood Fast for a Woodworking Project
When you’re pressed for time on a woodworking project and find out that the moisture content is a bit too high, you want the quickest way to get the job done. So, here are some options available to craftsmen whose project is overdue but whose wood is wet:

1. Visit a Kiln Drying Business
This is unarguably the fastest way to get your wood dry for a project. If you’re working on a sizable piece that requires working with chunks of wood/lumber, taking them to a kiln can get the moisture content to the right levels in just a couple of hours.
Of course, as a DIY woodworker, you most likely don’t have a kiln in your yard.
So, the best approach here is to find a wood drying kiln near you and take your wood there. Even if the closest one is a couple of hours away, you could go there, finish drying your wood, and drive back home in under seven hours.
Other methods of drying wood will take significantly longer than that. However, this approach will cost you some money, so you have to do some cost-benefit analysis on this one.
2. Use a Microwave
If you’ve got a sizable microwave and the wood pieces you’re working with can fit into it, you can dry the pieces by putting them inside and firing up the microwave for a very short time. This is a DIY technique that will get you results, but there’s always some danger to it.
You could damage the microwave or destroy your wood by burning the core. Microwaving the wood pieces for 90 seconds per time can reduce the chances of any of these problems arising. Test the wood with your moisture meter when it cools to see if you need to repeat the drying process.
Again, this is a risky approach to drying wood, so you should never take your eyes off the microwave during this process. You don’t want to accidentally start a fire in your workshop!
3. Combine a Fan and a Dehumidifier
Using a dehumidifier in combination with a fan is another approach you can go with when looking for a way to dry wood fast for a woodworking project (Source: Woodworking Trade). Granted, it’s not as fast as the two approaches we’ve seen above, but it’s a lot faster than air drying.
For this approach to work, you need to have some indoor space to dry the wood. Get a good dehumidifier and a high-volume fan in the room, and you can speed up the drying process considerably. Instead of waiting weeks for the wood to air-dry outdoors, you can have it ready to use in a few days.
I hope this gives you a head start on knowing how dry your wood should be for your DIY (and other) projects. For more on dry times, check out my article on how long wood glue takes to dry, too!