


A random orbital sander is a very efficient tool when it comes to sanding wood to a smooth finish, or removing paint or varnish.
Tip: Check out my guide to the best random orbital sanders if you are thinking about buying a new one, and haven’t decided which one to get.
In the past, many people preferred to use the old-style disc sanders or a belt sander. As technologies have been upgraded, so have sanding machines.
Random orbital sanders are a newer generation of sanding machines, and they’re straightforward to use, if you know what you’re doing.
Here, I break down how to remove paint with a random orbital sander (or just get a good smooth finish on unpainted or refinished wood), plus tips and common mistakes to avoid.
How to Use a Random Orbital Sander for Paint Removal
First, it’ll make your job a lot easier if you get everything ready beforehand. Most paint removal jobs will require the following:
- Random orbital sander (obviously!) – but if it’s not a cordless version, ensure you have enough room to maneuver from your power source
- Sandpaper – see below for which grit to use
- Safety goggles
- Dust mask
- Clamp
- Tack rag
- Vacuum cleaner or air filtration system
Most of following tips/steps also apply if you just want a good finish on wood, without it being painted first.
1. Protect Your Eyes and Lungs
Many people – especially when doing ‘quick’ DIY jobs – don’t realize that they can still breathe in a lot of toxins when sanding paint off a surface.
According to Yale, both the paint dust and the abrasives on the sandpaper itself can irritate the lungs if you breathe it in, and it may contain toxic elements like Chromium.
You don’t want this stuff in your eyes either, where small flakes of wood or paint can do significant damage, so always wear a mask and safety glasses.
2. Secure the item to be sanded in place
Before you start sanding, you should secure the item that you are going to sand, if this is practical.
I highly recommend that you should use a clamp in this case. This will make sure that the object doesn’t get tilted in the middle of your work. Random orbit sanders are good at creating smooth edges, but not if the sanded object can move under the sander.
Check whether the wood is tightly fixed with the clamp or not.
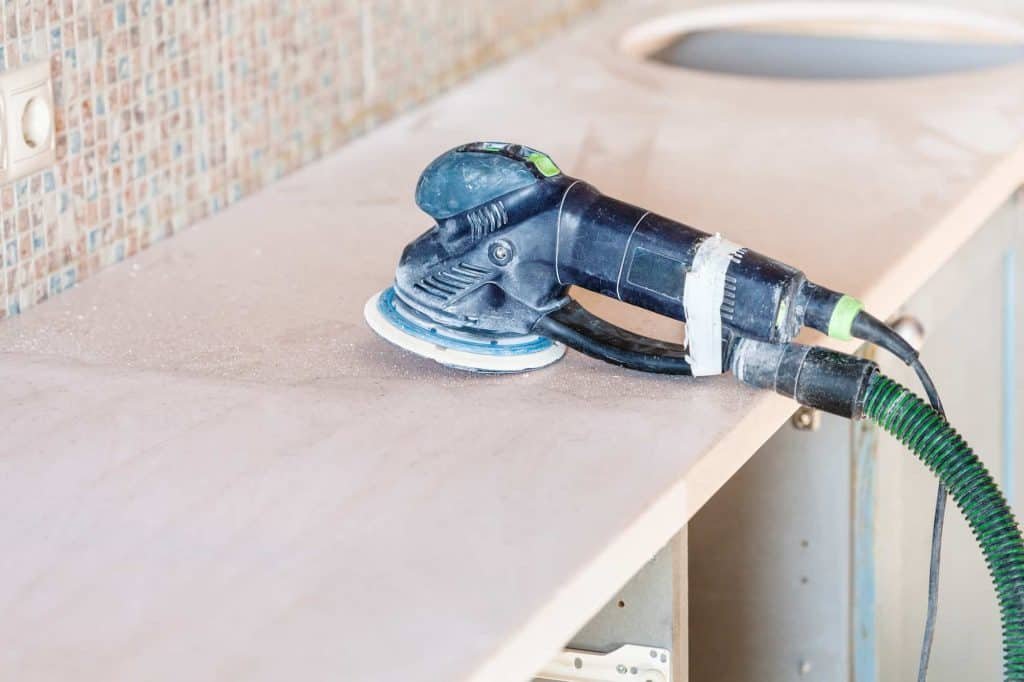
3. Connect the sander to a ventilation system or dust collector
If you can, connect the sander with a ventilation system or connect its dust bag. Many of the best random orbital sanders come with a dust collector.
There will be a fair amount of accumulated dust throughout the project, and the ventilation system will save your time and cleanup effort by collecting all of the wood and/or paint dust.
4. Remove any large or loose flakes of paint
With your hand or a piece of sandpaper, remove all loose, large chunks of paint that flake off easily.
These will stop them flying off as soon as the sander is near them, though of course, you should be wearing eye protection as per step one.
5. Fit Sandpaper to your Random Orbit Sander
Depending on your project’s size, you can use a 5-inch or 6-inch sanding pad. You can stick your sandpaper with a hook and loop sanding disk backed with Velcro, or a peel-and-stick adhesive.
The hook and loop sanding disks are available in various shapes, but you need to make sure that the holes on the sanding disk align with those on the bottom of the sander.
This is because the dust from your sanding goes through these holes to the vacuum for efficient dust collection.
When starting on a rough surface, use sanding paper with the lowest grit (like the 80), then as the surface gets smoother, progress sequentially to higher grits. Once the sandpaper is in place, it’s time to power up the sander.
6. Begin Sanding With the Sander in Touch with the Surface
Start your sander while it’s on top of the project’s surface to control the speed. If you have a variable speed sander, start slowly.
When you start it mid-air, it lands on the project with very high rpm (revolutions per minute) that could create a permanent dent on your surface.
Hold the random orbital sander firmly on your project surface, but do not press down or apply pressure. The idea is to gradually remove the paint, not aggressively remove it all in one sweep.
Contrary to what some people might tell you, since the sander moves in random orbits, the grains’ direction does not matter.
You can start sanding from any direction and progress whichever way suits you.
Hold the sander for a couple of seconds over a spot and move steadily instead of quickly moving back and forth. When you move slowly (like 15 seconds per foot), it will take you less time to get your smooth and uniform surface.
7. Switch to a Smoother Grit for Finishing the Paint Removal
Switch to a higher grit, like a 120, to make the surface even finer.
By this time, you’ll be almost back down to the bare wood or metal that was under the paint.
Most people draw lightly over the surface with a pencil to know when to switch to a higher grit. When all the writing is gone, you switch to a higher grit. Proceed through the grits till you finish with a 220.
When you finish sanding, lift the sander lightly off the surface before switching off.
8. Clean Up
When you finish sanding all the areas, turn off the machine. Take a tack rag and wipe the leftover dust.
If you find more or haven’t used a dust collector, then use a vacuum cleaner.
Common Mistakes When Using a Random Orbit Sander
I see the following mistakes when people use a random orbit sander for the first time (or even with more experience!). Here’s a list and tips on how to avoid the same mistakes:
1. Pressing Too Hard
Putting any pressure on the random orbit sander both tires you out prematurely and could create dents.
The machine’s weight and your hand are enough to do the job. It would be best to let the sander “float” and do its thing.
Pressing down your random orbit sander also risks raising the temperature, which could damage a non-heat-resistant surface.
2. Skimping on Sandpaper Grits
Moving from an 80 grit to a 220 grit will make you work harder and longer, but you still won’t get the ultra-fine finish.
You have to move sequentially, and there really are no shortcuts to a proper job.
3. Sanding Too Quickly
Sanding too quickly leaves behind swirl marks because the vibrations are not effective at producing random motion at high speed.
Take your time with each inch – you can always go over a surface again, but once over-sanded, you can’t get it back!
4. Using Low-Quality Sandpapers
Low-quality sandpapers wear out quickly, and once worn out; they are not so effective at cutting through the surface.
There’s really no such things as cheap sandpaper, as you’ll just get through more of it – and have to buy more.

5. Using The Sander’s Edge To Sand Off Stubborn Rough Areas
You should always work with your random orbital sander flat on the surface.
Any time you tilt it, you risk denting your project. Deal with stubborn areas with a palm sander, or let the random orbit sander work through it gradually, by making several passes.
6. Scuffing The Walls When Sanding Corners
Random orbital sanders easily bounce off the edges and scuff the walls when working on tight corners. If you’re removing paint from a floor, this is a common problem.
You should sand your materials before assembly or use a thin barrier to protect the walls. Alternatively, stop short of the wall and sand up to the flush end by hand.
7. Working On An Unstable Surface
Always make sure your project is held in place when sanding for best results.
Even if you don’t have a clamp as I suggested earlier in the steps, at least try to secure the object in some way, so it doesn’t move under you.

8. Unintentionally Rounding Off The Edges
Keep your random orbital sander flat and sand through the edges’ top. When working on edges, use a palm or belt sander instead, or maintain steady control.
Beginners find this hard, so if you need to keep the angles on your surface, stop just short of the edge and finish by hand.
9. Letting Paint or Wood Dust Clog the Sander
When dust clogs in your sander, you risk overheating the sanding disc, which could damage heat-sensitive projects, or melt the Velcro that holds the sandpaper in place.
To avoid this:
- Use a wire brush to comb lightly through the sandpaper. Avoid rubbing.
- Or use a rubber stick to clean the sandpaper.
- Ensure your filtration system is working efficiently by connecting to a vacuum.
10. Using Sandpaper That Peels off the Sander
If your sandpaper comes off your random orbit sander before you’ve finished your project, you should:
- Get a stronger adhesive-backed Velcro strip, or
- Buy a carbide sanding disk that comes with a new Velcro pad
With these tips, I hope you can confidently use a random orbit sander as your go-to tool for paint removal, on any surface, to get smooth, professional results.
If you haven’t already, check out my guide to the best random orbital sanders on the market, giving you a head start on any paint removal or general sanding jobs.