


Polyurethane is one of the most widely revered durable finishes around, and it’s also one of the easiest to apply. However, there are a few confusing elements to using it—especially when it comes to sanding.
Up and coming DIY enthusiasts often have sanding-related questions while using polyurethane or working on surfaces coated with the formula. This article is the ultimate guide to all your polyurethane sanding questions!
Do You Have to Sand Polyurethane Between Coats?
You have to sand between polyurethane coats on hardwood floors except when you’re working with specially made polyurethane designed to not require any sanding between coats. Other types of polyurethane (especially water-based formulas) require sanding between each layer applied.
Sanding between polyurethane coats while working on hardwood floors is very important because it is the best way to get the right level of adhesion between each layer. Proper sanding between coats will help ensure a smoother and level finish.

However, with some products like the Minwax Super Fast-Drying Polyurethane For Floors, you don’t have to worry about sanding between coats (source: The Stone Head).
The one caveat with using these products is that you must apply the next coat within 12 hours of the last one. So, if you don’t want to wake up at odd hours to apply multiple layers of polyurethane, it’s best to use standard products and sand between coats.
Do You Have to Sand Between Stain and Polyurethane?
You have to sand between stain and polyurethane if the formulas you are working with are discordant. Using water-based polyurethanes on oil-based stains will lead to an inconsistent finish as both formulas don’t match. Sanding between stain and polyurethane will deliver better results overall (source: Wood Critique).
What’s the Best Sandpaper Grit to Use?
When sanding between polyurethane coats on wooden floors, you can use 320-grit sandpaper wrapped around a hard block for the best result.

The first coat needs the most sanding. After the second coat, you can sand with 400-grit sandpaper. The last round of sanding should ideally be with 600-grit sandpaper for optimum smoothness (Source: Wood Magazine).
Don’t forget to wipe off the dust from each sanding with a clean rag dipped in mineral spirit. Sanding in alternating directions for each round is a good way to see if scratches from the previous round of sanding remain. You should also sand with the grain during the last round.
How Long Do You Typically Have to Wait Between Coats?
If you want to sand polyurethane between coats, it’s best to wait 24 to 48 hours for the last coat to dry. You need to wait for the surface to cure and harden for the best results (source: Expandus Ceramics).
However, some polyurethane manufacturers may have different dry times for their products. You can follow the directions they provide, but waiting a day or two between coats is typically the norm.

What Happens if You Don’t Sand Between Coats?
There’s no huge disadvantage to not sanding your hardwood floor between polyurethane coats. However, failing to sand will leave you with a finish that looks every inch like a shoddy job. You need to sand between coats to ensure a professional-grade finish.
Similarly, you’ll struggle with adhesion if you choose to apply water-based polyurethane on an oil-based stain without sanding. Both formulas don’t match, so you have to sand between coats to ensure proper bonding.
Can You Wet Sand Polyurethane?
Yes, it’s possible to wet sand polyurethane. However, you need to ensure that you’re sanding when the formula has completely cured (source: The Woodwork Place). Polyurethane may look and feel dry within a few hours, but proper curing takes a lot more time.
Dry polyurethane refers to a finish where the solvent has evaporated. In this scenario, the coat of finish will change from liquid to solid film. Cured polyurethane is one where there’s been some chemical reaction necessary for turning the liquid finish into a hard protective coat.
So, when you want to wet sand a wooden surface, you have to give the polyurethane adequate time to cure instead of jumping to the task once it is dry. You can dry sand a polyurethane surface within 48 hours of application. However, the right amount of time to wait will come down to the composition of the finish used.
You should wait a couple of weeks before wet sanding if you applied a water-based polyurethane finish. With an oil-based finish, you should wait up to a month for it to cure properly.

Do You Sand the Final Coat of Polyurethane?
Sanding the final coat of polyurethane may seem like the right way to get the perfect finish, but in many cases, you’ll end up scuffing the surface. The best approach is to sand the previous coats as smoothly as possible to ensure you leave a flat and even base for the final coat. This way, you can lay the final coat neatly to achieve an even finish.
There are two other alternatives to sanding the final coat of polyurethane. The first involves using 2000+ grit sanding paper and using a buffing compound. However, this will give you a super glossy finish you may not appreciate.
Alternatively, you can wet sand the final coat. It will deliver a better finish compared to dry sanding. What’s the process of smoothing the final coat of polyurethane? Here are some easy steps you should take:
- Wait for the finish to cure. Remember, you can only wet sand if the final polyurethane coat has cured. Wait a couple of weeks if you’ve used water-based polyurethane. Otherwise, you have to give the coat at least one month before you start the wet sanding process.
- Start with dry sanding. You need to dry sand the finish with 80-grit sandpaper. Go over the surface in small circular movements. After the first pass, change the sandpaper to a 100-grit one for a second pass. Complete the dry sanding with a final pass using 120-grit sandpaper.
- Wipe down the surface. After dry-sanding the surface, use a clean damp rag or a tack cloth to wipe it properly. Get rid of as much dirt as possible before you move to the next stage.
- Get wet sandpaper. You need wet sandpaper for this job because normal sandpaper will disintegrate once it’s soaked. Get as many high grit options as you can find, going up to 1500 if possible. The lowest grit you should get is 250.
- Soak the wet sandpaper. Soak the 250-grit wet sandpaper in a lubricating solution for half an hour. The lubricating solution can be plain water or soapy water containing household detergent. Mineral spirits can also work.
- Make a wet sanding block. Wrapping the soaked sandpaper around a small block of wood is typically enough. The combination will make it easier for you to hold the sandpaper while working on the surface.
- Start the wet sanding. Wet the surface a bit and start making small, circular movements over the surface you’re working on. The surface has to be wet, or you’ll end up with the scuffed finish you’re trying to avoid in the first place.
- Check the area as you work. As you go ahead with your circular movement over a particular area, you should ensure you’re checking the surface occasionally to confirm how smooth it is. You should ideally check it with every couple of swipes to confirm it is smooth enough. Continue like this until you’ve gone over the entire surface.
- Move to a higher grit if necessary. If the surface you worked on is as smooth as you’d want it to be, your job is done. If not, the next thing to do is to switch to a higher grit and repeat the wet sanding.
Can You Sand Polyurethane off Wood?
Yes, it is possible to sand polyurethane off the wood. However, you can’t use sandpaper alone to properly remove polyurethane from the surface of the wood. You should only sand off residual polyurethane after you’ve used other methods to remove the bulk of the finish (source: Suggest How).
When sanding polyurethane off wood, you should work with 120-150-grit sandpaper. Move to finer grits once you’re done removing the polyurethane to ensure you have a smoother finish. What are the other methods of removing polyurethane from wood?
Using Lacquer Thinner and Denatured Alcohol
You can remove polyurethane from wood using lacquer thinner and denatured alcohol. Here are the steps to follow:
- Prepare the area and protect yourself. Using this method to remove polyurethane involves handling some strong chemicals, so you’ll need to ensure proper ventilation and also get the right protective gear. Gloves, goggles, and masks are important. Don’t forget to protect the area you’re working on with a thick, plastic sheet.
- Mix lacquer thinner and denatured alcohol. Measure equal parts of both in a plastic bucket or an empty paint can. Stir the mix properly with a piece of wood. This mixture works because denatured alcohol is a cleaning agent, while lacquer thinner can dissolve varnishes and paint. The mix can remove the finish from the surface without affecting it.
- Apply with a brush. With the mix prepared, you can apply it to the polyurethane surface using a standard paintbrush. You’ll get better results by stroking the surface multiple times to ensure all corners containing polyurethane are covered.
- Remove the mixture. After you’ve properly coated the surface, wait for ten seconds to ensure it gets soaked in the wood. It is now time to remove it, using a steel wool pad and rubbing in the direction of the grain. You should work slowly at this stage to ensure the wood is properly stripped.
- Clean the wood. After you’ve properly wiped off the polyurethane with steel wool, the next step is to wash the wood. You’ll need a wood cleaner to get rid of the dirt before cleaning it with warm water. Dry off the surface with a clean piece of cloth.
Using Stripper
To remove polyurethane from wood using stripper, here are the steps to take:
- Prepare the work area and gather supplies. You’ll need to work in a properly ventilated environment, so work outdoors or make sure the room is airy enough if you have to work indoors. Get the supplies you need, including a plastic scraper, citrus stripper gel, a stripping pad, and an old toothbrush.
The last two items are necessary if you have to work on stubborn and hard-to-reach areas. You’ll also need chemical-resistant gloves and splash goggles. Cover the work area with some old paper or a drop cloth. - Apply the stripper. Shake the citrus stripper properly (after making sure it’s properly sealed), and pour it into a container. Apply it to the wood using a paintbrush. Use the old toothbrush to reach corners if necessary.
- Wait a while and test. After applying the stripper, wait for some time and use your plastic scraper to do a test removal. If the stripper comes off easily in that corner, it’s ready to be removed completely. The wait time can be anywhere between half an hour and a full day. If you have to leave the surface overnight, you should cover it up with plastic.
- Complete the scraping and wash off. Once you’re sure the stripper is ready to come off, do the scraping in the direction of the wood grain. For stubborn areas, dip an abrasive stripping pad in a citrus stripper to work on them. When done, wash off any residue left with a paint stripper. Once the surface is dry, you can continue your refinishing job.

Using Vinegar and Baking Soda
If you don’t want to use chemicals while trying to get rid of polyurethane, this option is probably best for you. Here’s what to do:
- Prepare the mix. You’ll need to mix cleaning vinegar, baking soda, and cornstarch for this process. To get the right mix, start with one cup of cornstarch and four cups of hot water. Mix these properly in a bowl containing half a cup of water.
You’ll get a paste after you’ve mixed it well. In a separate bowl, add four cups of water, half a cup of baking soda, and one tablespoon of vinegar. Stir this mixture well, then pour it into the first mixture and stir properly. - Apply the mixture. You can spread the mixture over the surface of the wood using a paintbrush. Wait a few minutes to allow the mixture to settle properly in the wood. Once the mix has stayed long enough, you can use a wire brush to scrub the surface.
Don’t hesitate to put some pressure while scrubbing the mix off the surface to ensure you remove everything. You also don’t have to worry about any discolorations. Once you’re done scrubbing the surface, allow it to air dry, or use a hairdryer if you’re pressed for time. - Sand the surface. You’ll need to get sandpapers of different grit sizes. 60, 80, and 120 are often the best. Start with the 60-grit sandpaper. After working for a while, you can see the polyurethane coming off and the wood’s natural color appearing on the surface.
Take precautions while sanding, and always make sure you are sanding towards the wood grain. If you sand both ways, you’ll end up with swirl marks all over the surface—a common mistake for newbie DIY enthusiasts. Once done with the 60-grit sandpaper, move to the 80-grit piece. You’ll find the wood getting smoother as you work. Round off the sanding process with a 120-grit paper for the best results. - Wipe the surface. Get a clean, dry rag to wipe the surface, and your wooden surface should be clear of polyurethane.
From the methods above, you can see why sanding polyurethane off wood can be a very time-consuming process if you intend to use it as a standalone method.
Sanding the surface after using a method like the vinegar mix will produce better results, especially on sizable surfaces. You’ll still need to be patient, but you’ll spend far less time on the project.
Should I Use a Sanding Sealer Before Polyurethane?
You should use a sanding sealer before polyurethane if you’re working on a large project for the following reasons (source: General Finishes):
- Sanding sealer is designed to ensure faster drying and faster sanding—factors that can greatly reduce the length of time you spend on a project.
- Its strong adhesion properties can help polyurethane to adhere better on a surface.
However, for smaller projects where you can’t justify spending extra money on a sanding sealer, you can skip straight to applying polyurethane.
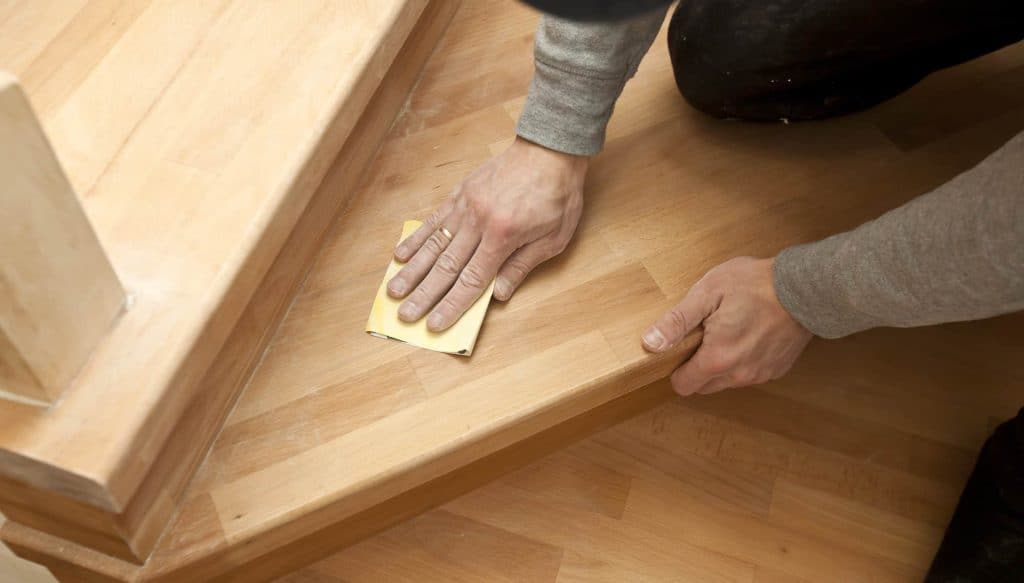
Do I have to Sand Before Applying Polyurethane?
Sanding before applying polyurethane on your floors is often a good idea, especially when you have varnish, old paint, or any other finishes on the floor. Sanding allows you to remove all such finishes (and dirt) to expose a fresh layer of wood for the polyurethane to adhere to (source: Home Depot).
To get a smooth coat of polyurethane on the surface, you have to sand the floor using an orbital sander or a sanding block. The latter is harder to work with for decent-sized floor spaces. An orbital sander can simplify the project a great deal.
You also need to get the right sanding paper for the project. If you’re working on a new wooden floor, you can start the project with 80-grit sandpaper, working your way up to finer grit. If you’re working on a refinished floor, then you can start working with 120-grit sandpaper from the start and progress upwards.
Once you’re done sanding the floor between grits, wipe off the resulting dust and any loose sandpaper bits with a clean cloth. Higher grit levels will remove the marks left by the coarser grit previously used. Continue like this until you achieve a level surface.
When you’ve achieved a smooth floor, you can apply polyurethane.

Can You Paint or Stain Polyurethane Without Sanding?
You should sand polyurethane surfaces before painting or staining them. Sanding helps prevent cracking, peeling, and bubbles. It also ensures the stain or paint can stick to the floor better.
When stains and paint don’t stick properly, you’ll get premature cracks and peels. Sanding gives you an abrasive surface that is more receptive to paints and stains (source: Latex Agent).
Some people avoid sanding by using additives that are strong enough to force adhesion. An option like Latex Agent Oil Bond is a popular example. However, the cost of these additives can be prohibitive.
Sanding remains the generally recommended way of making your polyurethane surface receptive to paints and stains.