Sanding is a great way to improve the look and feel of your floors, reduce the risk of splinters, and breathe new life into any space.
However, your work is cut out in spaces like the kitchen because there are more crevices to reach into, especially under your cabinets and kitchen toe kicks. How can you sand these spaces?
Here are a few ways you can sand under cabinets:
- Sand by hand.
- Use an adequately shaped power sander with the right accessories.
- Use a multipurpose oscillating tool.
The rest of the article will look at the above methods in more detail. Watch out for product recommendations, too.
Tip: I have another guide to sanding under radiators if that’s your project.
How To Sand Floors That Are Under Cabinets
Sanding open floors is often as simple as rolling out the drum sander for a few minutes. However, when you have to navigate under cabinets, it’s a different story.
With areas such as kitchen toe kicks, your power sander won’t fit into the tight space. You have to adopt a separate approach to properly sand this area and other spaces under your cabinet. Here are some of the methods you can adopt.

1. Sand by Hand
Floors under cabinets such as kitchen toe kicks can often take the size of a typical adult hand. Check if yours can fit in the floor area you’re looking to work on.
If it fits snugly and can allow you to move your hand sideways without scraping against the top of the cabinet, you can sand the space by hand using a sheet of sandpaper.
You should start with 100-grit sandpaper. It’s the perfect option because it can remove stains, lacquer, gouges, scratches, glue, etc., without eating too deep into the wood (source: Hunker).
After you’ve cleared the top layer of the wood and removed the stain, you can smooth the surface using finer-grit sandpaper—180 and above.
The downside to this is that it can take a lot of time. If you have a big kitchen with a sizable cabinet, you may spend hours on the job. Still, if you’re already used to hand sanding, it shouldn’t be too much of a challenge.
2. Use an Adequately Shaped Power Sander With the Right Accessories
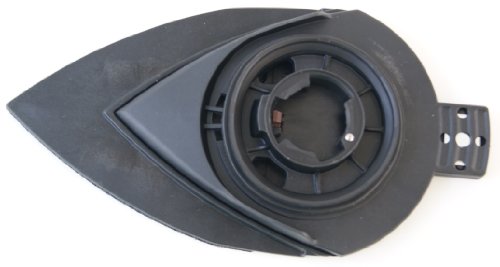
Triangle-tipped power sanders are designed to solve problems such as sanding floors under cabinets. The tips can reach into the floor spaces a more conventional sander design won’t reach. If you have one of these, check to see if it can fit in the space you’re working on.
Otherwise, you can consider adding one that has such a design. In some cases, you may need to buy an extended triangular plate to adequately cover the tight floor space.
If the triangular tip on your sander doesn’t quite reach the extremes on your kitchen toe kicks, you’ll end up sanding half the space. The extended triangular plate solves this problem.
For sanders such as the Festool RO 90, you can use the Festool 496803 Thin Triangular Extended Plate (Amazon.com). Other models will have similar accessories.
3. Use a Multipurpose Oscillating Tool
The multipurpose oscillating tool lives up to its name by being one of the most versatile bits of equipment you can ever add to your toolbox. It can sand, polish, saw, grind, and scrape almost any surface as long as you fit the right accessory to it.
The design of most oscillating tools also ensures they can seamlessly fit into spaces under cabinets such as toe kicks. With the sanding accessory inserted, you can turn on the machine and get to work.
There are many oscillating tools in the market to choose from, but below are a few on Amazon you can go with:
Dremel MM50-01 120V 5A Oscillating Tool
The Dremel MM50 is a powerful oscillating tool with a unique angled body that makes it a perfect fit for sanding under cabinets. The kit comes with some sanding accessories in the box, so you can jump right to the project immediately after unboxing.
With a five-amp motor and a compact head, the Dremel MM50 is good value for money. Other accessories in the box include blades and mounting pads.
Milwaukee 2626-20 M18 Orbiting Multi Tool
The Milwaukee 2626-20 is another high-performance oscillating tool that makes sanding under floor cabinets a breeze. The rubberized handle makes the tool easy on the hand, and the sturdy build ensures you’ll use it for a long time.
One of the best features of this tool is the variable 12-speed function. You can switch between the speeds to slowly or quickly go over a specific area.
However, you’d rarely need to go beyond the fourth-speed setting when sanding under your cabinet. The tool also comes with sanding accessories in the box.
Rockwell AW400 F80 Sonicrafter
The Rockwell oscillating tool has a power 4.2 amp motor and all the accessories you need to sand under your cabinet. The dual oscillation technology ensures precision while sanding such crevices. Like other top models in this niche, it has a variable speed dial.
You’ll also love the built-in LED lights, which allow you to see the quality of your work without needing an external light source.
Do I Even Need to Sand Under The Toe Kick?
You don’t necessarily need to sand under the toe kick. However, the area will stick out like a sore thumb if you ignore it after sanding the rest of the space.
Apart from the unsightly appearance, you may also risk getting splinters if the wood around the toe kick area has some cracked or broken segments.
Conclusion
These are your top options for sanding under your cabinet. Choose the option that appeals most to you, and don’t forget to adhere to best safety practices.


